Django is a high-level Python Web framework that encourages rapid development and clean, pragmatic design. Built by experienced developers, it takes care of much of the hassle of Web development, so you can focus on writing your app without needing to reinvent the wheel. It’s free and open source.
- Ridiculously fast – Django was designed to help developers take applications from concept to completion as quickly as possible.
- Fully loaded – Django includes dozens of extras you can use to handle common Web development tasks. Django takes care of user authentication, content administration, site maps, RSS feeds, and many more tasks — right out of the box.
- Reassuringly secure – Django takes security seriously and helps developers avoid many common security mistakes, such as SQL injection, cross-site scripting, cross-site request forgery and clickjacking. Its user authentication system provides a secure way to manage user accounts and passwords.
- Exceedingly scalable – Some of the busiest sites on the planet use Django’s ability to quickly and flexibly scale to meet the heaviest traffic demands.
- Incredibly versatile – Companies, organizations and governments have used Django to build all sorts of things — from content management systems to social networks to scientific computing platforms.
You will have a functioning Django site on your account that:
- Loads a static homepage for the domain.
- Loads the Django administration interface.
- Uses a SQLite database.
Create A Python Application In cPanel
The Setup Python App feature allows you to deploy Python applications on your cPanel while running the Apache web server.
You can check the functionality by visiting the cPanel, Setup Python App.

On the next page, you will be able to Create Application and check existing Web applications.
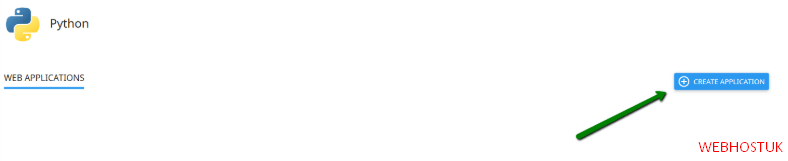
After clicking Create Application you will be presented with the app creation menu:
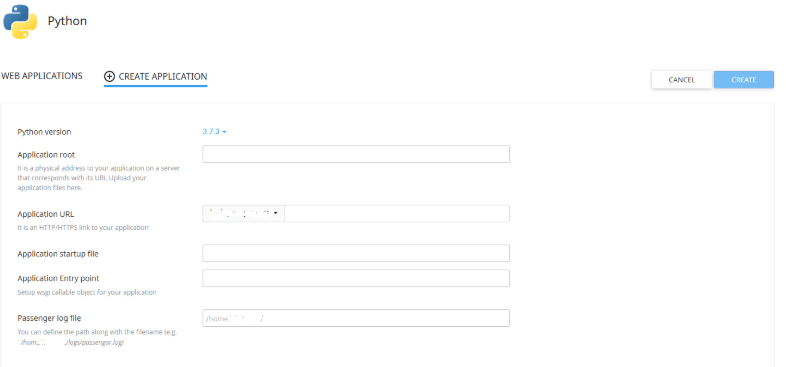
If you wish to create a new Python application, you must specify the Python version, fill in the Application root, and the Application URL. Then click Create.
Optionally, you can also set up Application startup file, Application Entry point and Passenger log file.
As soon as the environment is set, you can upload your application files to the application root directory.
When the application is created, you will be able to see the next page:
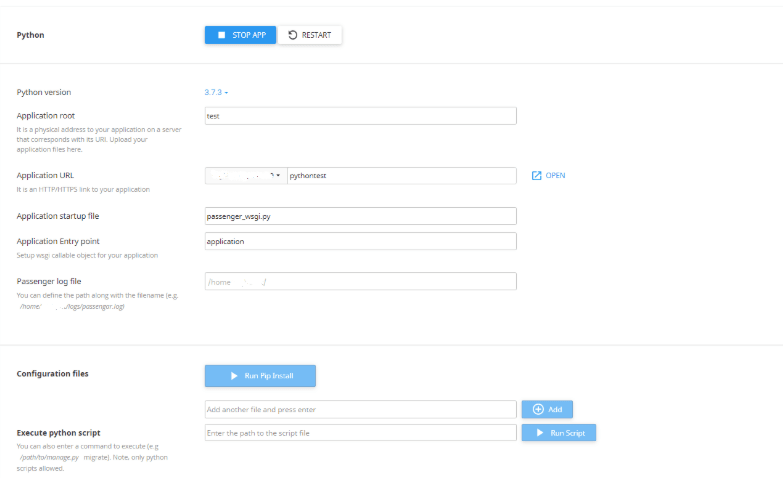
At the very start, you have the command necessary to enter your virtual environment. This is useful when you need to manually execute some commands either via SSH or with the terminal menu in cPanel.
To be able to do this, you need to enable Shell access as in this guide.
How to Configure the Django project
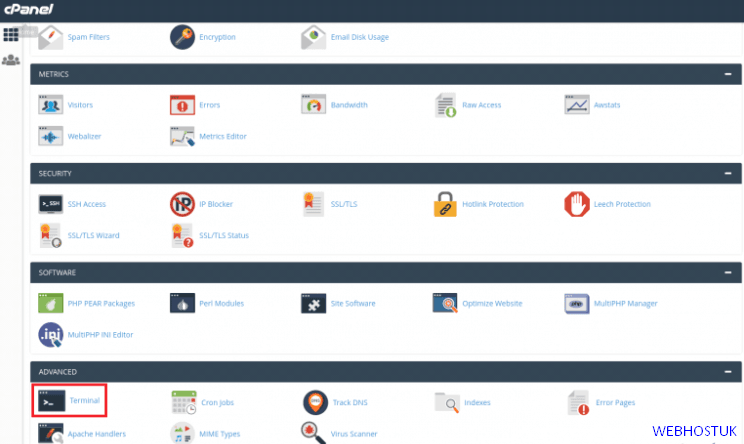
1) Login to cPanel.
2) You can see the option Terminal under the “ADVANCED” menu. Click the option to open the terminal.
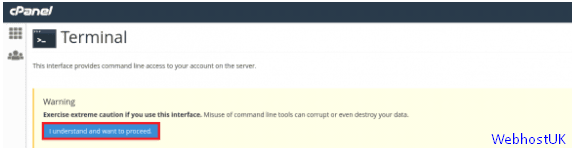
3) If you are accessing the terminal for the first time, a screen will appear with a warning message. Please click on the button proceed.
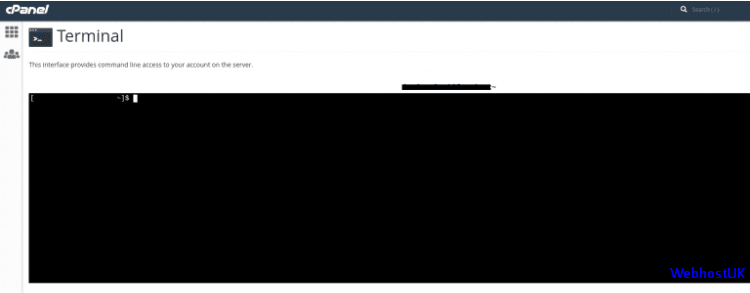
4) This interface provides command line access to your account on the server. You can now manage the account using CLI
5) Use the command you noted in the above step to activate the virtual environment. For example:
# source /home/username/virtualenv/myapp/3.6/bin/activate
You need to replace username with your cPanel username
The command prompt now starts with (myapp:3.6) to indicate that you are working in the myapp virtual environment with Python 3.6. All of the following commands in this article assume that you are working in the Python virtual environment.
6) Type the below command to install Django:
# cd ~pip
# install django==2.1.8
You can verify the version of Django installed, with the following command:
# django-admin --version
7) Type the below command for creating a Django project:
# django-admin startproject myapp ~/myapp
8) To create directories for the static project files, type the following commands:
# mkdir -p ~/myapp/templates/static_pages
# mkdir ~/myapp/static_files
# mkdir ~/myapp/static_media
a. Find the ALLOWED_HOSTS line and then modify it as below. Replace example.com with your own domain name:
ALLOWED_HOSTS = [‘example.com’]
b. Find the TEMPLATES block, and then modify it as below:
TEMPLATES = [
{
‘BACKEND’: ‘django.template.backends.django.DjangoTemplates’,
‘DIRS’: [os.path.join(BASE_DIR,’templates’)],
‘APP_DIRS’: True,
‘OPTIONS’: {
‘context_processors’: [
‘django.template.context_processors.debug’,
‘django.template.context_processors.request’,
‘django.contrib.auth.context_processors.auth’,
‘django.contrib.messages.context_processors.messages’,
],
},
},
]
c. Locate the STATIC_URL line, and then add the below lines beneath it:
MEDIA_URL = ‘/media/’
MEDIA_ROOT = os.path.join(BASE_DIR, “static_media”)
STATIC_URL = ‘/static/’
STATIC_ROOT = os.path.join(BASE_DIR, ‘static_files’)
9) Open the ~/myapp/myapp/urls.py file using the text editor. Delete the existing text and copy the below text into the file:
from django.contrib import admin
from django.urls import path, include
from django.conf import settings
from django.conf.urls.static import static
from django.conf.urls import url
from django.views.generic.base import TemplateView
urlpatterns = [
path(‘admin/’, admin.site.urls),
url(r’^$’, TemplateView.as_view(template_name=’static_pages/index.html’), name=’home’),
] + static(settings.MEDIA_URL, document_root=settings.MEDIA_ROOT)
urlpatterns += static(settings.STATIC_URL, document_root=settings.STATIC_ROOT)
10) Open the ~/myapp/passenger_wsgi.py file and do the following changes. Replace username with your own account username:
import myapp.wsgi
SCRIPT_NAME = '/home/username/myapp'

class PassengerPathInfoFix(object):
    """
    Sets PATH_INFO from REQUEST_URI because Passenger doesn't provide it.
    """
    def __init__(self, app):
        self.app = app

    def __call__(self, environ, start_response):
        from urllib.parse import unquote
        environ['SCRIPT_NAME'] = SCRIPT_NAME

        request_uri = unquote(environ['REQUEST_URI'])
        script_name = unquote(environ.get('SCRIPT_NAME', ''))
        offset = request_uri.startswith(script_name) and len(environ['SCRIPT_NAME']) or 0
        environ['PATH_INFO'] = request_uri[offset:].split('?', 1)[0]
        return self.app(environ, start_response)

application = myapp.wsgi.application
application = PassengerPathInfoFix(application)
11) Use a text editor to create a basic index.html file in the ~/myapp/templates/static_pages directory.
The file can be as simple as a text file that says Hello world.
12) Type the following command:
# python ~/myapp/manage.py migrate
13) Create and set up the superuser account:
- For this, type the below command:
# python ~/myapp/manage.py createsuperuser
- Type the administrator username at the Username prompt and then press Enter.
- Type the administrator e-mail address at the Email address prompt and then press Enter.
- Type the administrator password at the Password prompt and then press Enter.
14) To collect the static files, type the below commands:
# python ~/myapp/manage.py collectstatic
In case you are asked for overwriting existing files, type yes and then press Enter.
15) Restart the Python application in cPanel:
- Log in to cPanel.
- Click Setup Python App in the SOFTWARE section of the cPanel home screen.
- Locate the correct application under the Existing applications and then click Restart.
16) Test the Django site:
- Go to http://www.example.com, where example.com represents your domain name. The index.html file should load.
- Go to http://www.example.com/admin, where example.com represents your domain name. The Django administration login page should be displayed. Use the superuser credentials that you created earlier to log in.
If there a problem for the website to appear in your browser, run the passenger_wsgi.py file manually. For this, type the below command:
# python ~/myapp/passenger_wsgi.py
When you run this file, you should get any text output to the console. In case there are any errors, check the syntax in the configuration files.
That’s all! Now, you can easily install and configure Django on a Linux shared hosting account.